The world of game development continually offers more complex and captivating structures with evolving technologies. At the heart of this evolution lie engines and components. Unity stands out as one of the prominent engines in this realm, and Box Collider 3D is among its fundamental components.
Unity has been a game-changer in the realm of game development. It caters to various projects, ranging from simple 2D games to intricate 3D worlds. Box Collider 3D forms the foundation of physical interactions within these projects. It manages collisions, interactions, and much more between objects.
This guide aims to provide a detailed demonstration of how to use the Box Collider 3D within Unity. It’s suitable for everyone, from beginners to advanced users. Enriched with step-by-step code examples, this guide will showcase how to utilize Box Collider 3D in every possible way.
What is Box Collider 3D?
3D game development holds immense potential in terms of realism and interaction. The key to unlocking this potential lies in managing interactions between objects accurately. This is where Box Collider 3D comes into play.
Box Collider 3D is a component used within Unity’s physics engine. It represents the boundaries of a three-dimensional box. This box defines interactions with other objects in the game world. In other words, it determines what happens when an object collides with or enters this box.
Areas of Use
The most common application of Box Collider 3D is to manage collisions between in-game objects. For instance, it’s used to ensure a character bumps into a wall or passes through a door. Additionally, it’s ideal for inventory items, moving platforms, or other interactive elements. Box Collider 3D provides game developers the ability to manage various interactions within the game world with ease.
Setting Up Box Collider 3D
When you want to add physical interaction to an object in Unity, you’ll need to use a component like Box Collider 3D. This component defines and manages the interactions between objects. So, how do we set up and utilize Box Collider 3D?
Adding the Box Collider 3D Component
Adding a Box Collider 3D to an object in Unity is straightforward:
- Step 1
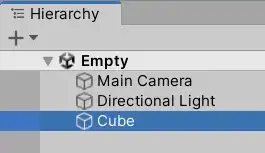
In the Unity Editor, select the object in the scene view that you wish to add interaction to.
- Step 2
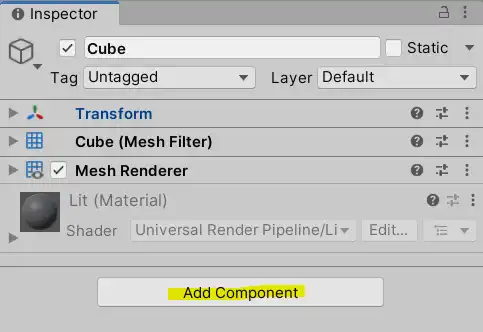
Click on the “Add Component” button in the Inspector window.
- Step 3
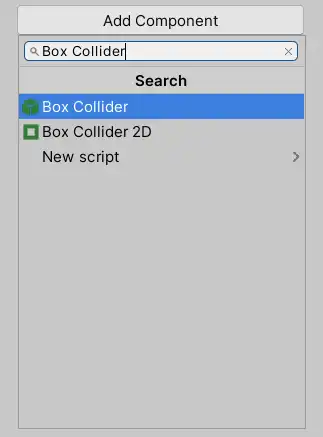
Find and click on the “Box Collider 3D” option under the “Physics” category.
- Step 4
Your object now has the Box Collider 3D component attached. You can adjust the properties of this component within the Inspector window.
These steps provide a general setup for simple interactions. For more complex interactions and configurations, you’ll need to understand all the features of Box Collider 3D.
An In-Depth Examination of Box Collider 3D
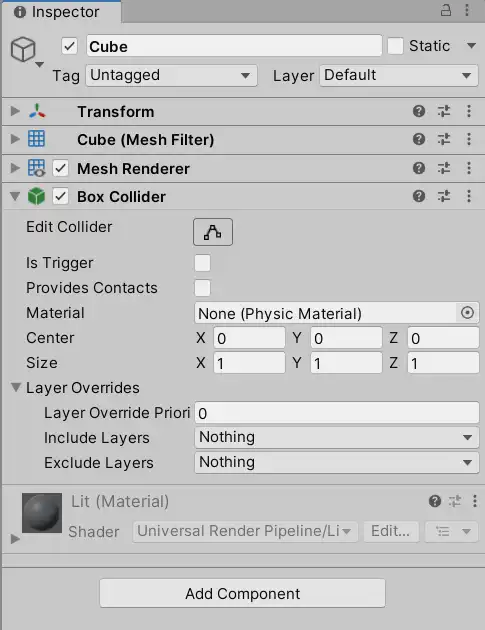
Box Collider 3D is a cornerstone component in the Unity game development process. To utilize this component fully, it’s essential to understand its properties, interactions, and triggers in detail.
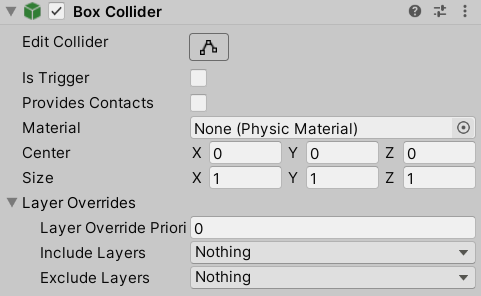
Property
| Is Trigger | When activated, this Collider is utilized to initiate events and bypasses the physics engine’s considerations. |
| Material | Indicates the Physics Material which orchestrates how this Collider communicates with others. |
| Center | Represents the Collider’s location within the object’s localized domain. |
| Size | Defines the Collider’s dimensions in the X, Y, and Z axes. |
- Edit Collider: Provides a visual representation of the Box Collider 3D. This feature allows game developers to adjust the collider’s size, position, and orientation directly in the scene window. It’s especially handy when you want to tailor a collider to the shape of an object.
- Is Trigger: This property determines whether the Box Collider 3D acts as a physical barrier or a trigger. If “Is Trigger” is enabled, other objects won’t physically interact with the collider. Instead, an event can be triggered when an object enters or exits this area.
- Provides Contacts: This offers detailed information about which surfaces are in contact during a collision. It’s useful for more complex collision interactions.
- Material: This property allows adjustments to the collider’s physical properties like friction and bounce. By selecting a Physic Material, you can customize how the object interacts with other surfaces.
- Center: Specifies the center of the Box Collider 3D. It’s typically adjusted to align the collider’s center with an object’s geometry.
- Size: Denotes the three-dimensional dimensions of the collider. It has three values: height, width, and depth.
- Layer Overrides: Allows customization of the collider’s interactions with layers. It’s used to determine how it interacts with objects on specific layers.
Interactions
Colliders are foundational in the Unity game development process since they define how objects in the game world interact with each other. Box Collider 3D encompasses features that determine how these interactions are managed.
- Interaction with Other Colliders: There can be many objects within a game, and most of these objects possess a collider. The interaction between these colliders dictates the physical realism of the game. For instance, a ball hitting a box or a character’s interaction with a wall falls into this category.
- Interaction with Surfaces and Materials: Colliders don’t just interact with other objects; they also interact with different surfaces and materials. This interaction is particularly determined by the Physic Material assigned to the collider. This material defines properties such as friction and bounce. These properties determine how an object slides on a slippery surface or bounces off. For a more detailed understanding, you can refer to our guide on Physic Material.
Triggers
In the realm of Unity game development, “triggers” are invaluable tools employed when a specific event needs to be initiated as an object enters, remains within, or exits a collider’s zone. This mechanism is crucial for various game scenarios, from automating door openings to launching missions as a character ventures into a designated zone.
OnTrigger Methods
Unity houses three fundamental trigger methods that are vital for a wide range of game mechanics:
OnTriggerEnter(): Invoked when an object first enters the trigger zone.
void OnTriggerEnter(Collider other)
{
    if(other.gameObject.CompareTag("Player"))
    {
        Debug.Log("Player has entered the trigger zone!");
    }
}
OnTriggerStay(): Continuously called for each frame as an object stays within the trigger boundary.
void OnTriggerStay(Collider other)
{
    if(other.gameObject.CompareTag("Player"))
    {
        Debug.Log("Player is within the trigger zone!");
    }
}
OnTriggerExit(): Triggered when an object departs from the trigger area.
void OnTriggerExit(Collider other)
{
    if(other.gameObject.CompareTag("Player"))
    {
        Debug.Log("Player has exited the trigger zone!");
    }
}
Event and Callback Functions
There might be instances where the straightforward OnTriggerEnter or OnTriggerExit methods won’t suffice. In such scenarios, defining custom events and callback functions becomes essential for intricate conditions.
For instance, if you wish to trigger an event after an object remains within the trigger zone for a certain duration, Unity’s Invoke function becomes your ally:
void OnTriggerStay(Collider other)
{
    if(other.gameObject.CompareTag("Player"))
    {
        Invoke("CustomFunction", 5f); // Calls CustomFunction after 5 seconds
    }
}

void CustomFunction()
{
    Debug.Log("Player sustained presence in the trigger zone for 5 seconds!");
}
Using this approach, the function named “CustomFunction” is invoked if the player stays within the trigger zone for a duration of 5 seconds.
Common Issues with Box Collider 3D
When developing games with Unity, there are some frequent challenges you might encounter with Box Collider 3D and other components. Recognizing and swiftly resolving these issues is crucial for an efficient game development process.
General Errors and Their Solutions
Some prevalent errors often encountered when using Box Collider 3D include:
- Collider Overlap: This is when two colliders unexpectedly overlap each other. It usually stems from misconfigured collider sizes or positions. To solve this, adjust the collider dimensions and positions carefully.
- Not Working as a Trigger: If the “Is Trigger” property isn’t set correctly, the collider might not function as a trigger. Check the “Is Trigger” property and enable it if necessary.
Optimization Tips
For Box Collider 3D to operate efficiently, here are some optimization suggestions:
- Minimal Collider Usage: Avoid using an excessive number of colliders unnecessarily in your scene. This might hinder performance.
- Use Simple Shapes: Opt for simple shapes (like boxes, spheres, etc.) instead of complex collider shapes to enhance performance.
Frequently Asked Questions
When developing games in Unity, numerous questions arise concerning features like Box Collider 3D. In this section, we address some of the most frequently asked questions regarding Box Collider 3D.
Box Collider 3D: This represents a simple collision in the form of a three-dimensional box. It’s typically employed for rudimentary objects and in scenes demanding high performance because its calculations are less intricate.
Mesh Collider: This collider is based on the actual geometry of a 3D model. It’s employed for more complex and custom shapes, but it comes with a higher computational cost.
The trigger mode determines whether a collider is used solely to initiate events. If a collider is set as a “Trigger”, it won’t engage in physical interactions with other objects. Instead, when an object enters or exits this zone, a specific event or function is activated.
Box Collider 3D typically requires fewer calculations compared to some other collider types, potentially benefiting performance. However, having an excessive number of colliders in a scene can negatively impact performance. Hence, it’s crucial to abstain from unnecessary collider usage and optimize according to the scene’s requirements.
Conclusion and Recommendations
Throughout this guide, we’ve delved into how to utilize Unity’s Box Collider 3D component, its fundamental features, usage scenarios, and the common challenges associated with this component. Now, by synthesizing this information, we can gain a more profound understanding of Box Collider 3D’s significance and place in game development.
The Significance of Box Collider 3D
Box Collider 3D is a pivotal component when developing 3D games in Unity. It’s essential for managing the physical interactions, movements, and positions of game objects within the game world. Especially in projects that require physics-based game mechanics, the correct usage of this component can directly influence the realism and quality of the game.
Recommended Resources for Further Progress
If you wish to further enhance your knowledge on Box Collider 3D and use this component more effectively, we recommend exploring the following resources:
- Unity’s Official Documentation: Unity’s official documentation provides in-depth information on all components, including Box Collider 3D.
- Unity Learn: Unity’s learning platform, offers video tutorials, guides, and sample projects on various topics.
- Forums and Communities: Unity’s official forum and other game development communities are brimming with experienced developers who can assist with any challenges you might encounter.